The following is a guest post by Loïc Giraudel. Loïc is a JavaScript and Git expert at Future PLC (Grenoble, France) and my brother. He also knows his way in Bash scripting and frontend performance. I’m very glad to have him writing here. :)
You can’t talk about frontend performance without talking about images. They are the heaviest component of a webpage. This is why it is important to optimise images before pushing things live.
So let’s try a not-so-easy exercise: write a script to optimise a directory of images. Yup, I know there are a lot of web services offering this kind of feature but:
- most of them can’t optimise several files at once,
- it’s not quite simple to use it in an industrial process,
- it’s always interesting to learn how those services work.
Shell scripting is a powerful skill to improve development efficiency by automating common tasks.
But first, a simple warning: don’t expect big optimisations. To have the best results, you have to decrease the image quality but it’s better to do this manually than automatically. We are going to script simple operations that remove metadata and other losslessly informations.
I’m working on Linux environment so this script will be a Bash script. Don’t worry! I will start with an introduction to Bash scripting in a Windows environment.
Bash is the GNU shell and the most common shell in Unix/Linux environment. A shell is a command-line interpreter allowing to access to all the functionalities of the OS. Shell scripting is a powerful skill to improve development efficiency by automating common tasks like building a project and deploying it.
Use Linux flavour in Windows
To be able to run Linux scripts on Windows, there are two methods:
- use a Virtual Machine with a Linux distribution on it,
- use a Linux simulator.
Since it can be quite a pain to set up a virtual machine, we will go for the latter with Cygwin. Cygwin is a Linux simulator. Go to the download section, grab the setup.exe file and execute it to launch the installer. You can leave all settings by default until you get to the step asking you which packages to install.
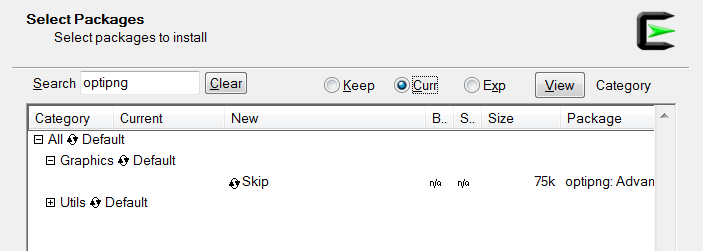
To add a package, click on the "Skip" label to switch it to a package version. Search for the following packages and add them (clicking on "Skip" is enough):
- optipng
- pngcrush
- jpeg
- util-linux
Once Cygwin is fully installed, simply open a Cygwin terminal. Let’s create a workspace to host our optimisation script: we create a "workspace" directory in the current user home:
# Create the workspace folder
mkdir workspace
# Enter the workspace folder
cd workspace
By default, Cygwin is installed at C:/cygwin/ so our new directory is at C:/cygwin/home/[username]/workspace (where [username] is your username). Let’s create a "images" directory and fill it with some random images from the wild wild web (you can do this manually). For this exercise, we are going to take cat pictures because, you know, everybody love cats.
Optimising an image with the command line
For each file, our script is going to run optipng and pngcrush for PNG files and jpegtran for JPG files. Before going any further and start writing the script, let’s make a first try with all of these tools starting with optipng:

Note: the -o7 parameter force optipng to use the slowest mode. The fastest is -o0.
Then pngcrush:

And now a JPG optimisation with jpegtran:

Building the script
You’ll find the whole script at the end of the article. If you want to try things as we go through all of this, you can save it (optimise.sh) now from this GitHub gist.
Options parsing
As obvious as it can be, our script needs some parameters:
-ior--inputto specify an input directory-oor--outputto specify an output directory-qor--quietto disable verbose output-sor--no-statsto disable the output of stats after the run-hor--helpto display some help
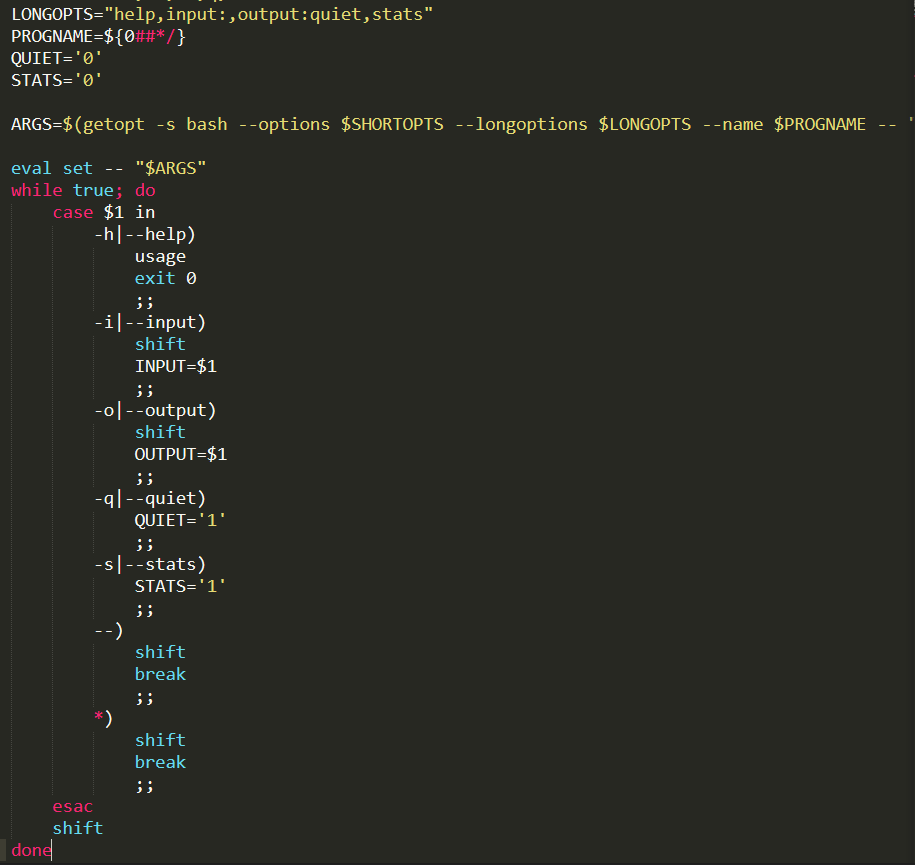
There is a common pattern to parse script options, based on the getopt command. First, we create two variables to store both the short and long version of each parameter. A parameter which requires a specific value (for example our input and output directories) must end with ":".

Then we are going to use the getopt command to parse the parameters passed to script and use a loop to call functions or define variables to store values. For this, we will also need to know the script name.
Help function
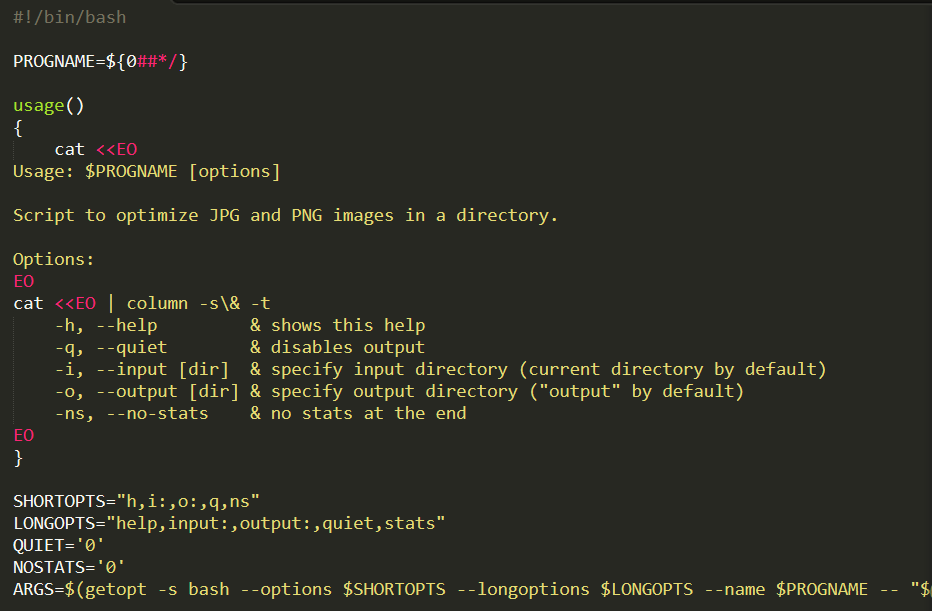
Now, we have to create two functions:
- the
usage()function, called in the parameters loop if there is a-hor--helpparameter, - a
main()function which will do the optimisation of the images.
To be called, the functions must be declared before the parameters loop.
Let’s try our help function. To be able to run the script, we have to add execution mode (+x) on it with the command chmod.
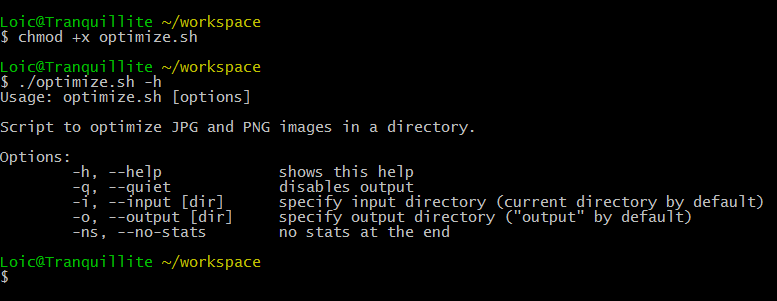
Pretty cool, isn’t it ?
Note, if you get a couple of errors like "./optimise.sh: line 2: $'\r' : command not found", you have to turn line endings in Unix mode. To do so, open optimise.sh in Sublime Text 2 and go to View > Line endings > Unix.
Main function
And now, let’s create the main function. We won’t deal with --no-stats and --quiet parameters for now. Below is the skeleton of our main function; it might looks complicated but it’s really not trust me.

So our main function starts by initializing both input and output directories with passed parameters; if left empty we take the current folder as input and create an output folder in the current one (thanks to the mkdir command once again).
The -p parameter of the mkdir command forces the creation of all intermediate directories if they are missing.
Once the input and output are ready, there is a little trick to deal with files containing spaces. Let’s say I have a file named "soft kitty warm kitty.png" (little ball of fur, anyone?), the loop will split this into 4 elements which will obviously lead to errors. To prevent this from happening, we can change the Internal File Separator (which is a space character by default) to set an end-of-line character. We will restore the original IFS at the end of the loop.
The image files are retrieved with the find command, which accepts a regular expression as parameter. If the output directory is a subdirectory of input directory (which is the case if we don’t specify any of both) and if the output directory is not empty, we don’t want to process images from here so we skip filepaths which contain the output directory path. We do this with the grep -v $OUTPUT command.
And then, we loop through the files and call an optimise_image function with two parameters: the input and output filename for the image.
Now, we have to create this optimise_image() method which is going to be fairly easy since we already have seen the command to optimise images before.

Output informations
Let’s add some useful output to see progress and the final stats. What about something like this:
file1 ...................... [ DONE ]
file2 ...................... [ DONE ]
file_with_a_long_name ...... [ DONE ]
…
Would be neat, wouldn’t it? To do this, we first need to find the longest filename by doing a fast loop on the files.
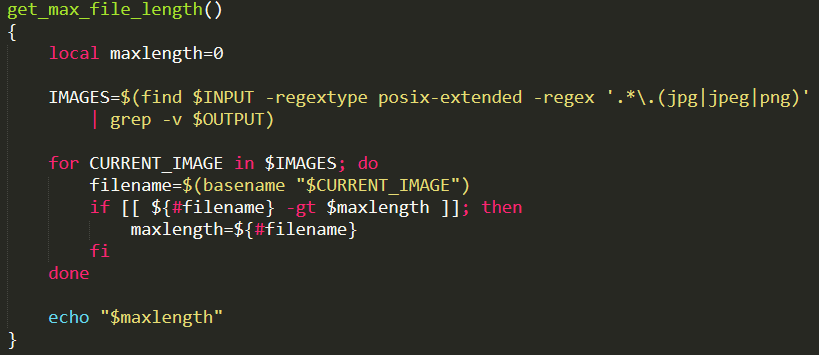
Then before our main loop, we:
- retrieve the length of the longest filename
- create a very long string of dots (".")
- set a max line length equals to the length of the longest filename + the length of our " [ DONE ]" string (9 characters) + a small number (5 here) to have some space between the longest name and the " [ DONE ]" string.
Finally, in the main loop we display the filename then the "." symbols and the the " [ DONE ]" string.

Let’s try it by running the following command:
# All parameters to default
./optimise.sh
# Or with custom options
./optimise.sh --input images --output optimised-images
# Or with custom options and shorthand
./optimise.sh -i images -o optimised-images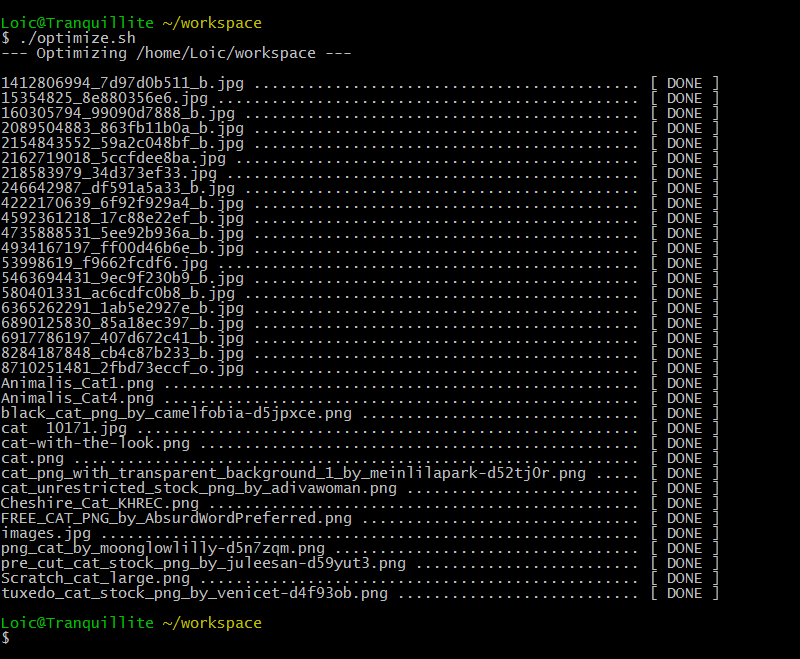
Final stats
For the final stats we are going to display the amount of space saved. The optimise_image()</code> method will increase atotal_input_sizewith the filesize of the image to optimise, and atotal_output_size` with the filesize of the output image. At the end of the loop, we will use this two counters to display the stats.

To display human readable numbers, we can use a human_readable_filesize() method, retrieved from StackExchange (let’s not reinvent the wheel, shall we?).
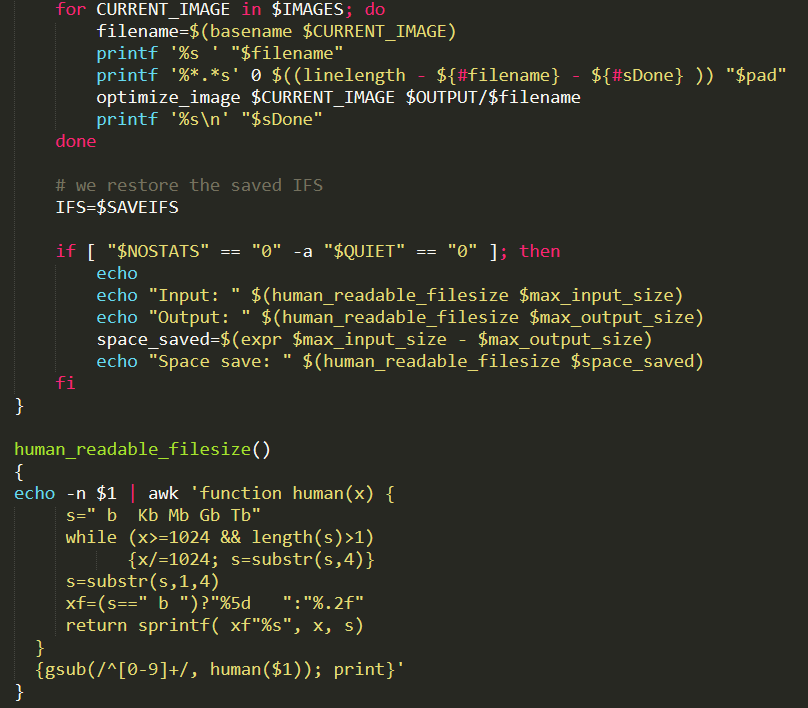
Let’s try it before adding the last bites to our code. Once again, we simply run ./optimise.sh (or with additional parameters if needed).
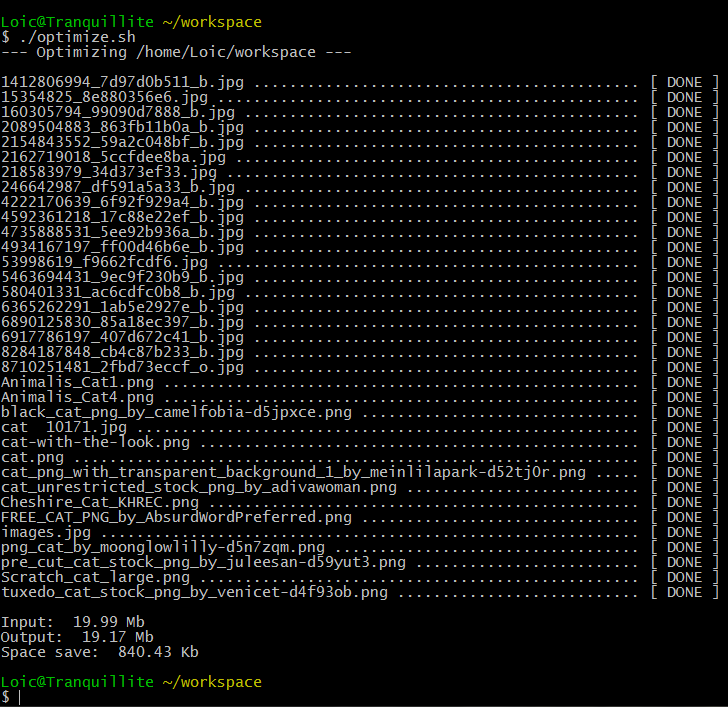
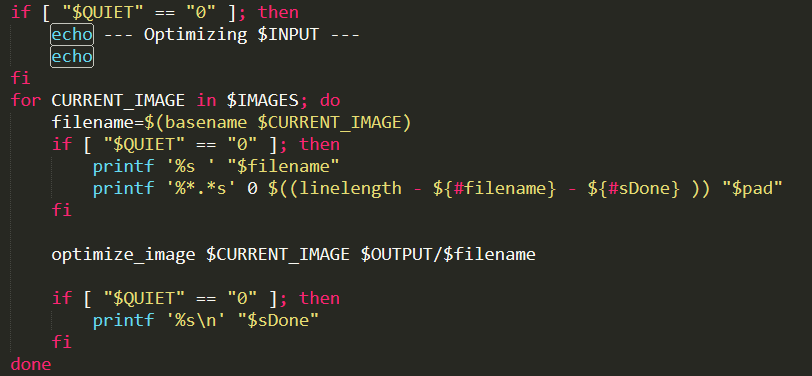
Keep it up people, we are almost done! We just have to display progress output if the quiet mode is off.
Final result
Below lies the final script or you can grab it directly from this GitHub gist.
#!/bin/bash
PROGNAME=${0##*/}
INPUT=''
QUIET='0'
NOSTATS='0'
max_input_size=0
max_output_size=0
usage()
{
cat <<EO
Usage: $PROGNAME [options]
Script to optimise JPG and PNG images in a directory.
Options:
EO
cat <<EO | column -s\& -t
-h, --help & shows this help
-q, --quiet & disables output
-i, --input [dir] & specify input directory (current directory by default)
-o, --output [dir] & specify output directory ("output" by default)
-ns, --no-stats & no stats at the end
EO
}
# $1: input image
# $2: output image
optimise_image()
{
input_file_size=$(stat -c%s "$1")
max_input_size=$(expr $max_input_size + $input_file_size)
if [ "${1##*.}" = "png" ]; then
optipng -o1 -clobber -quiet $1 -out $2
pngcrush -q -rem alla -reduce $1 $2 >/dev/null
fi
if [ "${1##*.}" = "jpg" -o "${1##*.}" = "jpeg" ]; then
jpegtran -copy none -progressive $1 > $2
fi
output_file_size=$(stat -c%s "$2")
max_output_size=$(expr $max_output_size + $output_file_size)
}
get_max_file_length()
{
local maxlength=0
IMAGES=$(find $INPUT -regextype posix-extended -regex '.*\.(jpg|jpeg|png)' | grep -v $OUTPUT)
for CURRENT_IMAGE in $IMAGES; do
filename=$(basename "$CURRENT_IMAGE")
if [[ ${#filename} -gt $maxlength ]]; then
maxlength=${#filename}
fi
done
echo "$maxlength"
}
main()
{
# If $INPUT is empty, then we use current directory
if [[ "$INPUT" == "" ]]; then
INPUT=$(pwd)
fi
# If $OUTPUT is empty, then we use the directory "output" in the current directory
if [[ "$OUTPUT" == "" ]]; then
OUTPUT=$(pwd)/output
fi
# We create the output directory
mkdir -p $OUTPUT
# To avoid some troubles with filename with spaces, we store the current IFS (Internal File Separator)…
SAVEIFS=$IFS
# …and we set a new one
IFS=$(echo -en "\n\b")
max_filelength=`get_max_file_length`
pad=$(printf '%0.1s' "."{1..600})
sDone=' [ DONE ]'
linelength=$(expr $max_filelength + ${#sDone} + 5)
# Search of all jpg/jpeg/png in $INPUT
# We remove images from $OUTPUT if $OUTPUT is a subdirectory of $INPUT
IMAGES=$(find $INPUT -regextype posix-extended -regex '.*\.(jpg|jpeg|png)' | grep -v $OUTPUT)
if [ "$QUIET" == "0" ]; then
echo ––– Optimising $INPUT –––
echo
fi
for CURRENT_IMAGE in $IMAGES; do
filename=$(basename $CURRENT_IMAGE)
if [ "$QUIET" == "0" ]; then
printf '%s ' "$filename"
printf '%*.*s' 0 $((linelength - ${#filename} - ${#sDone} )) "$pad"
fi
optimise_image $CURRENT_IMAGE $OUTPUT/$filename
if [ "$QUIET" == "0" ]; then
printf '%s\n' "$sDone"
fi
done
# we restore the saved IFS
IFS=$SAVEIFS
if [ "$NOSTATS" == "0" -a "$QUIET" == "0" ]; then
echo
echo "Input: " $(human_readable_filesize $max_input_size)
echo "Output: " $(human_readable_filesize $max_output_size)
space_saved=$(expr $max_input_size - $max_output_size)
echo "Space save: " $(human_readable_filesize $space_saved)
fi
}
human_readable_filesize()
{
echo -n $1 | awk 'function human(x) {
s=" b Kb Mb Gb Tb"
while (x>=1024 && length(s)>1)
{x/=1024; s=substr(s,4)}
s=substr(s,1,4)
xf=(s==" b ")?"%5d ":"%.2f"
return sprintf( xf"%s", x, s)
}
{gsub(/^[0-9]+/, human($1)); print}'
}
SHORTOPTS="h,i:,o:,q,s"
LONGOPTS="help,input:,output:,quiet,no-stats"
ARGS=$(getopt -s bash --options $SHORTOPTS --longoptions $LONGOPTS --name $PROGNAME -- "$@")
eval set -- "$ARGS"
while true; do
case $1 in
-h|--help)
usage
exit 0
;;
-i|--input)
shift
INPUT=$1
;;
-o|--output)
shift
OUTPUT=$1
;;
-q|--quiet)
QUIET='1'
;;
-s|--no-stats)
NOSTATS='1'
;;
--)
shift
break
;;
*)
shift
break
;;
esac
shift
done
mainWhat now ?
Of course this is just a simple sample (no pun intended); there is still a lot of room for improvements. Here is a couple of things we could do to improve it:
- add GIF support,
- use other tools to optimise JPG and PNG in the
optimise_imagemethod (by the way, I highly recommand you to read this great article by Stoyan Stefanov), - add a progress bar,
- try to add some lossy optimisations for JPG,
- add an auto-upload function to upload to your FTP,
- use a configuration file to tweak the optimisation tools…